|
|
|
| | Each one of these sections includes a bunch of illustrations and screen shots so they may download a bit slowly on slow connections. |
For a single file, printable version version of these instructions, click here. Note that the file which next comes up will NOT have the menu on the left side, and may take a little while to load. |
1. |
Select "List of Files"
|
When you click on Load... the
load screen pops up.
The load screen allows you to download either:
| Floppy Image File | Select this option if you want to download a
complete floppy image. Floppy image files have
names with extensions that vary from vintage
machine to machine. Some of them are named
file.dsk for example.
For more information on this option, please see the example
Section 2 - Selecting & downloading a floppy image
.
| | List of Files | Select this option if you want to download one or more
individual files. The SVD-CP will wrap the file(s)
in a floppy image before downloading them to the SVD.
This is a great option if you have a binary program,
text file, or even basic program that you would like
to run.
|
For this case, select List of files.
The SVD-CP is capable of downloading a single file (or group of files
if you like) to the SVD without having a floppy image
containing the file. The SVD-CP comes with multiple floppy images
that can be used as "containers" for these files.
|
2. |
Selecting a floppy image "container"
|
|
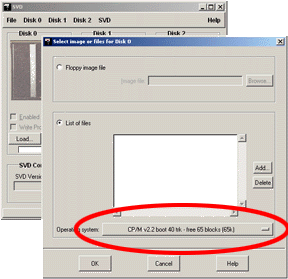
To use this feature, you first need to select the desired floppy container
image.
This images appear in a selection box at the bottom of the load screen (as in the picture
to the right) labeled as Operating System. The point
here is that each image contains an "operating system" or at least a
"file system" image that the SVD-CP knows about.
By knowing the file system, the SVD-CP can write an individual file
on it. In fact, it can write many if there is enough room.
Note that there are often many choices of operating systems and,
therefore, file systems to choose from.
Most of these images are also bootable.
In fact you can use these images without adding files.
This turns out to be a very nice way to download a bootable
file system image.
| Some files (like binary files or even Basic programs)
require a particular operating system or Basic version to
operate properly. If you find that one of these programs will
not run after download, try a different "container" floppy image
with a different OS or Basic.
|
|
|
|
3. |
Selecting files
|
|
Once you have chosen the container image to use,
you must simply select the files you would like to
include in the image.
Click on the Add...
button to browse for a file.
Continue to click on Add...
to add multiple files.
To delete a file from the list, highlight the file
and click on Delete.
| For some Operating System selections
the Add... button is greyed out -- i.e. it won't let
you click on it.
In these cases, the SVD-CP doesn't understand the file system on
the given image, so it cannot add files.
HOWEVER,
these images can still be used to boot your machine.
You just can't add files to them.
|
| Remember: you do NOT have to add files
to an image to use it. If you select List of files
but don't select any files,
the given Operating System image will be used even though additional
files are not added to it. This is a great way to
boot up an operating system...even if you don't have a separate
image.
|
After you have added all of the files to image (if any) click on
OK
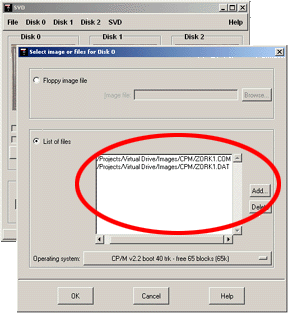
| |
|
4. |
Download All
|
|
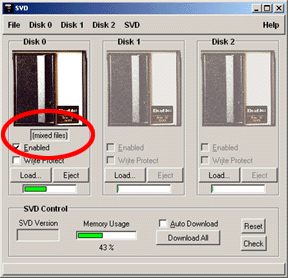
In this example, virtual floppy #0 was loaded with
two Zork CP/M files.
In the area where the image name normally appears,
under the picture of the floppy drive,
the words "(mixed files)" appear.
This indicates that there are a set of files loaded
in that virtual floppy.
At this point,
as when loading a simple image
you need to click on Download All
to download the virtual floppy to the SVD.
|
|
|
5. |
The SVD is now ready!
|
Before download, and during the download itself, the
SVD will not respond to floppy requests
from your vintage computer. It will essentially be
"invisible."
After a completed download the the SVD, however, it immediately
begins to operate as a floppy drive to the vintage equipment.
That is, any request by the vintage computer to a floppy drive
that matches a loaded virtual
floppy will be serviced by the SVD.
This works for both booting, and reading data from the SVD.
In most cases, this includes writing to the SVD as well.
|
|
| | Each one of these sections includes a bunch of illustrations and screen shots so they may download a bit slowly on slow connections. |
For a single file, printable version version of these instructions, click here. Note that the file which next comes up will NOT have the menu on the left side, and may take a little while to load. |
|
