|
|

|
Since all drives are connected externally to the H8,
it is rather easy to connect it to the SVD. The SVD
looks just like another external drive to the H8.
In fact, the SVD is especially wonderful if you have
come across an H8 but not a floppy drive for it.
The H8 floppy interface is quite standard for the vintage.
However, it is important to point out that the
standard floppy controller is a hard-sectored
controller. This means that the floppies are a bit different.
They have "index holes" for every sector as well as for the
index.
The SVD supports the hard-sectored 5¼" format only.
Although, it is possible that it will support other
controllers for the H8...none but the hard-sectored 5¼"
have been tested, however.
|
Connecting the SVD
All you need for connecting the SVD to the H8 is a 34-conductor
ribbon cable that will connect to the H8 on one end, and to the
SVD on the other.
If you already have an H17 floppy drive, it
has a cable already connected to it.
You can easily use the SVD's supplied 34-pin edge-card
connector to add an external connector
suitable for connecting to the SVD.
This is what I did.
When doing this, ensure that the plastic key within the
34-pin edge-card connector is oriented closest to the
stripe on the ribbon cable.
It is extremely important to ensure that you have pin-1
oriented correctly relative to the SVD and the H8 floppy
controller.
Drive Number Configuration
If you are using an existing H17, the drives within it are
probably configured as drives #0 and #1.
You can still use the SVD in this case, but note that you
can only use it as drive #2.
On my machine, I moved the DIP switches within the H17 cabinet
to make the two drives #1 and #2, allowing me to use the SVD
as drive #0. Although you can boot from any drive you like,
some software is picky (or otherwise programmed) to run from
drive #0. Fortunately, most of the time this isn't an issue
because upon booting an OS such as HDOS 2.0, whatever the
boot drive, it is assigned SY0:, making software work well.
Drive Select Weirdness
|
The floppy controllers for the Heathkit line has one very weird
feature: the drive select lines are backwards relative
to all of the other machines of the vintage.
This really isn't a big issue, just something you
need to know.
The "standard" floppy interface of the vintage supported
3 or 4 floppy drives. Nearly all of the machines using
the interface used the same signal lines for the same
floppy drive...all but the H8/H89 (as far as I know).
The effect of this weirdness is that the SVD signal
lights are backwards from what you would normally
expect. So when when the H8 is accessing drive
# 0 (the internal drive) the SVD will indicate that
it is accessing drive #2. And when the H89 is accessing
drive #2, the SVD will indicate that it is acessing
drive #0. I guess the one silver lining is that drive
#1 looks like drive #1!
| NOTE: the SVD Control Program software has an option that maps the
virtual drive to the right H8 floppy number. This option is
normally set, though you can turn it off if you like.
The effect of the option is that when you download drive #2
to the SVD, it will cross-over to drive #0 taking into account
the signal weirdness. This does NOT affect the indicator lights
which will still be backward.
|
|
Floppy
Number | Normal Signal
Pin Number | H89 Signal
Pin Number |
| # 0 | 10 | 14 |
| # 1 | 12 | 12 |
| # 2 | 14 | 10 |
|
|
Booting from the SVD
There are numerous options for booting the H8 from
the SVD.
The steps described here assume a very simple
set-up where you have
only the SVD connected to the H8.
These steps also assume that you are using
a floppy cable
that isn't one of the "pulled-pin"
drive selecting cables, so the SVD can act as
either drive #0, #1, or drive #2.
Further, these steps assume that you have a
terminal or terminal emulator (like the H19)
connected already.
1. |
Download a Boot Image to the SVD
|
Once you have the SVD connected, download a boot image
to virtual floppy #0. This is done by clicking on the
"Load..." button. For these examples I chose "List of Files"
and then the HDOS 2.0 entry in "Operating Systems."
Don't forget to click on "Download All" to get the image
transferred to the SVD.
|
2. |
Reboot the H8
|
|
Once you have the image downloaded to the SVD, it is
simply a matter of rebooting the H8 using the
disk drive.
Unfortunately, there are quite a few options for how
the boot would occur.
Here are the main options and instructions for booting.
These boot procedures are performed on the keypad
of the H8 (picture of keypad).
Note that my machine uses the PAM-37 ROM, and I haven't tested
any other mechanism.
Note that the first thing to do it get control of the machine
is to get it reset by pressing both keys at once:
|
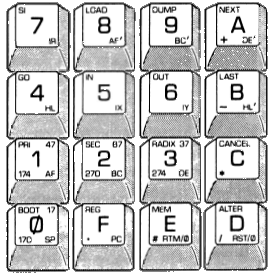
|
XCON8 ROM

| Will display "Pri H17" and boot |
| PAM-8 GO ROM

| The "GO" key |
| PAM-8 ROM


| Prepare to load PC with REG, PC, ALTER |
|
| And boot with ALTER, GO |
| PAM-37 Universal Boot

| Boot using H-17, standard port, and unit #0. If booting from unit #1, use "1" as the last key. |
|
|
3. |
Boot HDOS 2.0
|
|
SPECIAL NOTE: you're not done!
After booting as above,
the H8 has only started
the HDOS booting process.
The first thing that it does from there is
wait for you to press the space bar
a couple of times.
Then you will get the HDOS boot prompt, to which
you can just hit (enter).
After following this procedure,
the H8 will boot HDOS off of the SVD.
After booting, HDOS will refer to
the boot drive as SY0: no matter which
floppy it is connected to.
When booting from a floppy other than #0, the SY
devices will be rotated after boot. So in the case of booting
from floppy #1,
SY0: will refer to floppy #1,
SY1: will refer to floppy #2, and
SY2: will refer to floppy #0
(the internal floppy).
|
(space) (space)

ACTION? <BOOT> (enter)
| |
|
|
Sample Directory Listing
> DIR (enter)

NAME    .EXT    SIZE      DATE            FLAGS   02-JUL-77

EDIT    .ABS    17      03-NOV-80        W
BASIC   .ABS    17      03-NOV-80        W
PATCH   .ABS    17      03-NOV-80        W
INIT    .ABS    17      03-NOV-80        W
SYSGEN  .ABS    17      03-NOV-80        W
TEST17  .ABS    17      03-NOV-80        W
TEST47  .ABS    17      03-NOV-80        W

   7 FILES, USING 181 SECTORS (0 FREE)
>_
| |
Running a Program
Once you are able to "list" a virtual floppy from the SVD,
running programs is easy. Here are a couple of examples of running
programs from some disks.
1. |
Basic Program
|
Running basic programs on the H8
requires that you first start BASIC.
On the supplied HDOS 2.0 image there is Benton Harbor BASIC.
You simply type "BASIC" to get it running.
| NOTE: You should NOT use the write-protect
setting for the HDOS image when running BASIC.
For some reason, BASIC requires that the write-protect
not be on. Weird.
|
After you are in BASIC, you can "RUN" a BASIC program directly.
Or, you can use the somewhat odd function called "OLD" to load
a BASIC program off of the floppy.
You can either specify the file extension ".BAS" or if you don't,
it will be assumed.
|
 > BASIC (enter)
EXTENDED BENTON HARBOR BASIC #110.06.00

* RUN "PROGRAM.BAS" (enter)
| |
|
|
2. |
Non-basic Programs (binary)
|
|
Running a binary program (or ".ABS") is easy,
just type in its name.
If the file is on a different diskette, other than SY0:,
you can prepend the drive number such as "SY1:PROGRAM.ABS".
|
|
|
3. |
Programs on Other Drives
|
|
Accessing drives other than the boot drive (SY0:) requires
that you "MOUNT" the drive first.
Here's an example of mounting virtual drive #1 from the SVD.
This assumes that you've downloaded an image to both virtual
drive #0 and virtual drive #1.
|
 > MOUNT SY1: (enter)
...
 > SY1:PROGRAM (enter)
| |
|
|
Creating a REAL floppy from an SVD image
One of the best things about the SVD is that it allows you to both:
- create real floppies from a floppy image
- backup your real floppies to an image that you can upload to your PC
Here is an example of making a real copy of the HDOS 2.0 diskette.
This process requires that you have another
floppy drive connected to the H8 controller,
and that the other drive is wired as a known drive number.
It is best if you can set the external drive as being
drive #2 or #1 so that the SVD can be drive #0.
Setting up external floppies is unfortunately beyond the scope
of this web-site.
But I'd be glad to help if you are having problems, please e-mail me.
This example assumes that the SVD is connected to the H8 controller
and that another real floppy drive is connected and is wired
as drive #2.
It assumes, too,
that you
have downloaded the HDOS 2.0 image to the SVD as drive #0.
Further, it assumes that you have already booted from the SVD as described
above.
1. |
Format the real floppy
|
|
The first thing to do when making a copy of an image is to
format the real floppy.
It isn't completely necessary to format the floppy first,
if it has been formatted before.
But it isn't a bad idea. Note, however, that you should never try
to format the image in the SVD! More on this in the next section.
|
|
|
2. |
Copy the SVD Image
|
|
After formatting,
it remains to copy the data from the SVD
to the real floppy.
Assuming you have a formatted floppy in SY2: (the internal drive)
then use the "SYSGEN" command to copy the floppy.
Note that "SYSGEN" is used to create Bootable floppies.
That is, it copies the boot data to the target diskette as well
as other files when you specify the pattern "*.*" as in this
example.
SYSGEN will ask you to specify the source and target for the
command.
If you don't need to create a bootable floppy, you
can simply use the "COPY" command as shown here.
|
or
 > COPY SY2:*.*=SY0:*.* (enter)
...
| |
|
|
Creating an SVD image of a REAL floppy
To make a virtual copy of one of your real floppies,
essentially you simply reverse the floppy drive numbers in the command above...but there is another
important step as described below.
1. |
Download a Floppy Image to the SVD
|
There is a "blank" floppy image that comes with the SVD software.
It is best to download that image to the SVD so that you have
more room for files. You can download any image you
like, but you may have to delete some files from the image to make space.
Think of this step as simply putting a blank diskette into a real floppy
drive. The SVD needs this "blank diskette" too.
It is important to note that this blank diskette has already been formatted.
You cannot format an image in the SVD, it must be done ahead of time.
|
2. |
DO NOT try to format the SVD image
|
Unlike in the above example, when making a real floppy,
you should NOT try to format the image in the SVD.
| The SVD emulates generation of the sectors as well as
the format of the sectors.
"Formatting" of the image is, therefore, not necessary.
It isn't fatal to the SVD, but it will mess up the image causing
you to have to download the blank image again.
|
|
3. |
Copy the Real image
|
|
After downloading the blank, run the command that will copy
the real floppy to the blank in the SVD.
This is just like when copying to a real diskette as
described above.
|
 > COPY SY0:*.*=SY2:*.* (enter)
...
| |
|
| IMPORTANT NOTE: you must be sure to turn OFF the WRITE-PROTECT
checkbox in the SVD Control Program software for the blank
diskette you are downloading.
Otherwise the blank diskette won't be writable.
ALSO, if you use the "COPY" command, you must turn off the
write protect for the source diskette your are copying FROM.
Weird but true. HDOS
scribbles some info on the diskette you are copying from
and the "COPY" command won't work otherwise. "SYSGEN",
however, will work without turning off write-protect
on the source diskette.
Note that in the example to the right,
that the diskette numbers are reversed from
those in the above examples.
|
|
4. |
Upload the new image to your PC
|
Now you need to return to the PC, and upload
the changed image from the SVD back to the PC.
Please see the PC Software reference pages
Section 5 - Uploading a floppy image
for information on how to do this.
|
5. |
Save the new image
|
Finally, you can save the uploaded image to a new
PC file. Again see the PC Software reference pages
Section 6 - Saving a floppy image
for more information.
|
Setting Options
|
One very annoying thing about the vanilla HDOS image is
that is shows backspaces as slash-letter, indicating what
letters are being erased.
You can fix this problem by issuing the right "SET" command.
In the example here, the "SET" command is issued that sets
the backspace to actually erase the character.
If you want this effect to be set "permanently" you should
do the following:
- Turn off the write-protect for the downloaded HDOS boot image
- Execute the SET command as shown here
- Upload the changed HDOS image to the PC and store it in a new file
Then you can use this modified HDOS image to boot from.
Just as if you had made a back-up image of a real HDOS floppy and
customized it.
|
|
Booting & Using CP/M
I'm a big CP/M fan.
In the SVD Control Program (SVD CP) software there are a couple of CP/M images.
You can use these to boot the H8 with CP/M.
One of the images contains Supercalc too.
Note that you need to have 64K in your H8 along with the Z80 processor
card to run CP/M on it!
In addition to being able to boot from CP/M, you can
use the SVD CP to download single files
to the H89.
Check out the software section for more information.
Section 4 - Downloading a file
|
Can't boot from the SVD
When your vintage computer won't boot from the SVD
there is often a simple problem that you can correct.
The LEDs on the SVD can help you figure out the problem.
Follow these steps to do so.
- Plug the SVD into the floppy cable.
- Make sure that the computer is off. Or in in the case of an
external floppy controller (as with the TRS-80 Model I Expansion Interface)
make sure it is off as well.
- Looking at the LEDs on the SVD, you should see only the Power LED lit.
Here are a few different possibilities for the SVD LEDs:
| Power | 
| | Disk 0 | 
| | Disk 1 |
| | Track 0 | 
| | Write |
|
| | This is what you should see. The SVD is getting
power and the cable appears to be connected correctly...at least so far so good.
|
|
| Power |
| | Disk 0 |
| | Disk 1 |
| | Track 0 |
| | Write |
|
| | (all LEDs off) The SVD isn't receiving power. Check the power connector and the power supply.
|
|
| Power |
| | Disk 0 | 
| | Disk 1 |
| | Track 0 |
| | Write |
|
| | If the Disk 0 and 1 LEDs are on as well as the Write LED, then you most probably
have the floppy cable connected
"backwards". Be careful to note where the cable stripe is as well as the plastic
key on the connector. Worse come to worse, just try reversing the connector.
|
|
- Download a bootable image to floppy #0 on the SVD from the PC Software.
- Turn on the external floppy controller if there is one,
then turn on the main computer.
This should cause it to try to
boot from the SVD. When you turn the main unit on, watch the LEDs on the SVD,
and compare to the following:
| Power |
| | Disk 0 |
| | Disk 1 |
| | Track 0 |
| | Write |
|
| | When trying to boot from the SVD, the SVD Disk 0 LED along with the Track 0
LED should come on. This indicates that the computer is trying to
boot from Disk 0 and that the SVD is responding with data from the
first track of the downloaded floppy image (Track 0). Note, however, that
the Track 0 light will only come on for a short time. As soon as the
boot process gets going, the computer will "seek" the virtual drive to
a different track, causing the Track 0 LED to go out.
|
|
| Power |
| | Disk 0 |
| | Disk 1 |
| | Track 0 |
| | Write |
|
| | BE CAREFUL - the Track 0 LED may have come on for a short time
right after you try to boot. Watch the LED while
turning on the unit. However, if the Track 0 LED doesn't come
on but the Disk 0 LED comes on, that indicates that the floppy
controller is working and that it is
trying to boot from Disk 0. The fact that that Track 0 light
doesn't come on indicates that the diskette image wasn't downloaded
to Disk #0 in the PC Software or that it wasn't downloaded to the SVD.
|
|
| Power |
| | Disk 0 |
| | Disk 1 |
| | Track 0 |
| | Write |
|
| | If the Write LED is on, there isn't termination on the cable.
You should use the terminated connector on the SVD or use a terminated real floppy
on the same floppy cable.
(see here for more info on termination).
|
|
| Power |
| | Disk 0 |
| | Disk 1 |
| | Track 0 |
| | Write |
|
| | If the Disk 0 LED doesn't come on, the computer
isn't trying to boot from the SVD. This
indicates that the cable to the SVD (and other floppy drives) isn't connected
correctly.
|
|
- If the Drive 0 and Track 0 lights both come on, then after a very
short time, the Track 0 light should go out.
- If this all worked correctly, but the computer didn't boot, it probably
means that you downloaded an incorrect floppy image. Try a different one.
|
Can't boot from the SVD
The above general trouble-shooting instructions should help
quite a bit to get booting from the SVD.
Note, though, that the drive number indicator lights are
reversed for the SVD when working with the H89 or H8.
| Booting Drive 0 |
Booting Drive 1 |
Booting Drive 2 |
| Power |
| | Disk 0 |
| | Disk 1 |
| | Track 0 |
| | Write |
|
| | Note that it LOOKS like the SVD is booting from Disk 2.
|
|
| Power |
| | Disk 0 |
| | Disk 1 |
| | Track 0 |
| | Write |
|
| | It's nice that drive 1 is STILL drive 1 even though
the wires are different in the floppy controller.
|
|
| Power |
| | Disk 0 |
| | Disk 1 |
| | Track 0 |
| | Write |
|
| | Note that it LOOKS like the SVD is booting from Disk 0.
|
|
Problems Getting Running - Whoa is Memory
Many people have experienced
trouble with getting programs to run on the H8 after
booting from the SVD or a real diskette for that matter.
The problem has almost universally turned out to be a
memory issue.
With the numerous memory boards and age of them, it is
common for a chunk of memory, or a whole board to be
out of commission.
What I have done was to use a special H8 prototyping bread-board
and wired up 64K of memory using a "more modern" low-power SRAM.
The circuit is easy, and it works very well.
|
 | H17 emulator image format, and H8D raw data image format supported.
|
| single-sided single density hard-sectored(SS SD HS)
|
| reading/booting the diskette image
|
| writing the diskette image
|
 | formatting the diskette image
|
| CP/M and HDOS support
|
| downloading individual files - you can download individual BASIC programs or command files for HDOS and CP/M
|
| |
| www.sebhc.org | - It's rather tough to find Heathkit H8/H89 images...unless you know
where to look. Jack Rubin and friends have created a great Heathkit
site dedicated to preserving the old hardware and software.
You must subscribe to the SEBHC user group to get to the archive.
See this web-page for information about how to do so. |
| File Extension | Common Machine | Description
| | .h17 |
Heathkit |
One of the original formats for Heathkit H8/H89 floppy images,
.h17 is a text-based (read "big") format that contains
a sector by sector hex dump of the data on the disk. It includes
descriptive information about the disk in the title as well.
One of the nice things about this format is that it preserves
the volume number of the diskette even if it is a CP/M diskette.
For HDOS diskettes, the volume number is elsewhere on the image.
| | .h8d |
Heathkit |
The compact analog to the .h17 format is the binary
.h8d format.
This format is a binary dump of contiguous sectors from the
floppy.
It is assumed that there are 35 tracks of 10 256-byte sectors.
So the size of these files is fixed.
Note that this format is easily confused with many other binary
dump formats.
But, again, the SVD sorts things out pretty well...in this case
based upon the file extension.
|
|
|
|

